
Sealer vs. Undercoat vs. Primer: Key Difference & Use
Painting your home sounds simple and exciting enough. Pick a colour, grab a roller, and off you go. But fast forward a few months, and that once-fresh paint is suddenly peeling, fading, or looking patchy. Sound familiar?
The culprit is mostly skipping the right primer, undercoat, or sealer before the topcoat. And if you’re not quite sure what each of those does or if you even need them, you’re definitely lacking the foundation for a lasting, professional-looking result.
That’s why we’ve created this guide. We’ll break down the differences between primer, undercoat, and paint sealer, and show you exactly when to use them for a flawless interior or exterior painting finish. Let’s get started.
The Real Difference Between Sealer, Undercoat and Primer
Painting a wall may seem as simple as rolling on colour, but pros know the real secret is in the prep coats. The terms primer, undercoat and sealer get tossed around a lot, sometimes interchangeably, which is confusing. The truth is, each product serves a unique purpose.
Let’s dig deeper into each, so you’ll know exactly which to use for your next residential or commercial painting project in Perth.
Primer Paint | The Essential Basecoat that Improves Adhesion
Primer is the first coat you apply on a brand-new or bare surface. Its main job is to create a uniform foundation that your colour paint can grip onto.
A high-quality primer helps:
- Block stains or tannins
- Prevent rust on metal surfaces
- Stop moisture from causing blistering or peeling
- Prevent paint from soaking into porous surfaces like timber or plaster
- Fill in tiny pits and rough patches
- Create a smooth base for the final coat
- Improve adhesion of the topcoat
In short, primer paint is your first step toward a durable, professional finish. Skipping primer is tempting, but it usually means needing multiple coats of colour paint to hide imperfections; a waste of time and money.
Undercoat Paint | Evens Out Colours & Smoothens Imperfections
After priming (or over an existing painted surface), the undercoat is applied to further refine the base before the final colour. It’s a middleman that evens everything out.
A quality undercoat:
- Fills in small scratches, holes, and leftover texture
- Smooths out surface imperfections
- Neutralises strong or dark base colours
- Helps block out visual defects and uneven sheens
- Prevents old hues from affecting your new paint colour
- Provides better, controlled adhesion for the topcoat
At Final Touch Paint & Décor, we use a tinted undercoat after priming, especially when covering wood trim or dark colours. This way, the final coat of paint glides on evenly. Undercoats typically have a thinner consistency for smooth application, exactly to ensure your final colour comes out looking uniform.
Paint Sealer | Blocks and Protects Surfaces
A sealer is a specialised coating that seals in the surface, much like its name suggests. Sealers are mostly used on raw, porous, or stain-prone materials to create a barrier before the standard primer or paint goes on. For instance, concrete, plaster, or knotty pine wood need a sealer to prevent moisture, dust or resins from bleeding through.
Sealers do the following:
- Create a moisture-resistant barrier
- Prevent stains, sap, and tannins from bleeding through
- Help paint stick better to tricky surfaces
- Provide a tougher, more durable base than standard primer
Think of a sealer as a shield. It’s applied before primer, or used instead of primer in certain conditions. For example, on new render or concrete in Perth’s climate, a concrete-specific sealer stops alkaline damage. On timber, a clear wood sealer blocks out old varnish or sap bleed.
We use sealers in specialised cases. For example, sealing in old staining on a weatherboard house before doing an exterior paint, or sealing new ceiling plaster against moisture. Using the right sealer at the right time is why your finished paint won’t peel or blotch after a few rains.
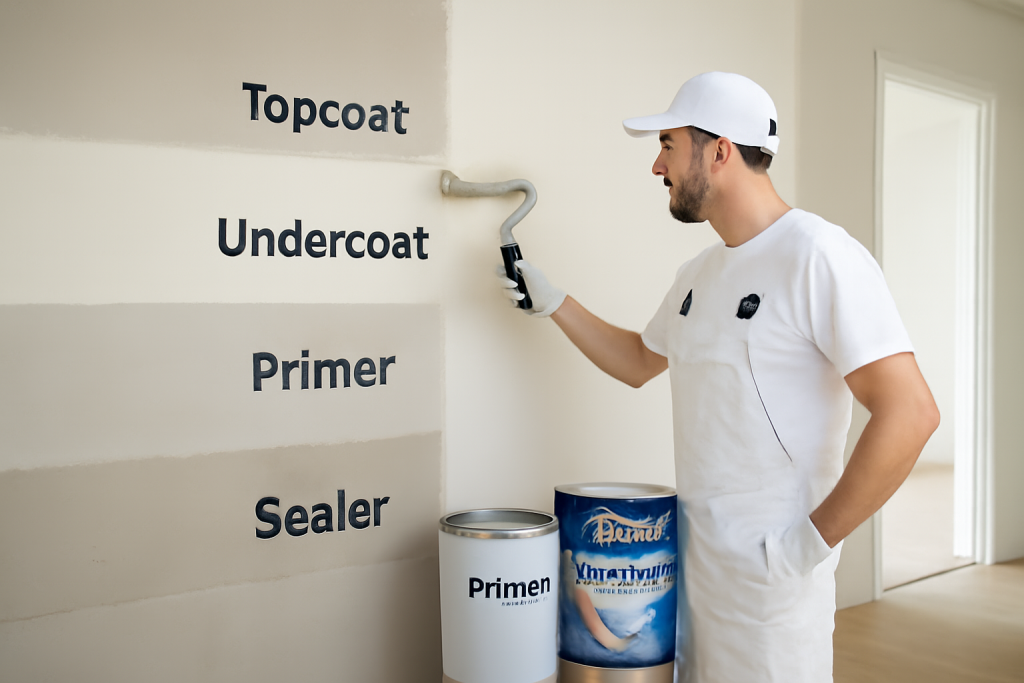
Primer vs. Undercoat vs. Sealer | Key Difference & Use at a Glance
The roles of primer, undercoat and sealer overlap a bit, but each has a distinct job. Here’s a quick summary to keep them straight, followed by a comparison table:
- Primer is your go-to basecoat on bare surfaces that helps paint stick and blocks out stains.
- Undercoat is like a smoothening layer that evens out colour and fills small imperfections before your final coat.
- Sealer works as a stain-blocking, moisture-sealing barrier, especially for porous or tricky surfaces like timber knots or concrete.
To make it even clearer, here’s a handy comparison table:
| Type of Prep Coat | What It Is | When to Use It | What It Does (Benefits) |
| Primer Paint | A basecoat applied to raw or bare surfaces. | On fresh drywall, timber, metal, masonry, or plaster before painting. | ensures paint adhesionprevents peeling hides surface stains, rust, and uneven textures |
| Undercoat Paint | An intermediate coat applied over primer or old paint. | After priming or on existing paint before topcoat. | provides a uniform base tonehides surface blemishesimproves topcoat appearance and consistency |
| Paint Sealer | A protective coat that locks in stains and blocks moisture. | On porous or stain-prone surfaces like knotty pine, water-damaged walls, old smoke-stained ceilings, or concrete. | seals surfaces to prevent bleed-throughblocks odours and moisture ideal for hard-to-paint or high-humidity areas |
Which Comes First? Primer, Undercoat or Sealer?
In a professional house painting project, the ideal sequence typically looks like this:
Sealer (if needed) → Primer → Undercoat → Topcoat
However, modern multi-purpose products can combine two or even all three functions (e.g., primer-sealer-undercoat combos). They’re convenient options for small DIY jobs or where the surface doesn’t need extensive prep.
Still, for best results, especially in homes with older walls, tricky stains, or porous surfaces, professional house painters in Perth like our team at Final Touch Paint & Décor stick to individual steps. That way, every layer is doing its specific job, ensuring your finish is flawless and built to last.
Where to Use Primer, Undercoat and Sealer | Choosing the Right Prep Coat for Every Surface
Picking the right prep coat depends on surface condition and paint project. Here’s how to choose the right prep coat based on surface type and conditions:
New Drywall or Bare Timber (Interior & Exterior)
Fresh plaster, timber trims, or bare weatherboards? You’ll need primer paint to seal the porous surface and help your topcoat stick evenly.
Old Painted Walls (Still in Good Shape)
If the existing paint is intact and you’re just switching colours, especially to something lighter, an undercoat helps even out the base and makes that new colour pop.
Stained or Knotty Surfaces
Got water marks, smoke stains, or knotty timber? Use a sealer or stain-blocking primer to stop stains from bleeding through. Perfect for bathrooms, ceilings, and timber trims that have seen better days.
Exterior Timber & Decking
Painting outdoors? Use a paint sealer followed by primer to handle moisture and UV damage. This is essential for fences, decks and pergolas.
Concrete, Brick or Masonry
Chalky, rough, or porous surfaces like concrete and brick need a sealer or masonry primer to prevent uneven soaking and flaking.
Metal Surfaces
Metal gates, doors, or trims? Always use a rust-inhibiting primer. Regular sealers won’t stick and you’ll risk peeling paint or corrosion later on.
Smelly or Damaged Walls
After water damage, fire, or years of pet smells, an odour-sealing primer works wonders. It locks in stains and smells, ideal for kitchens, rentals, or restoration projects.
Quick Prep Coat Rule of Thumb
- Is the surface new and raw? → Start with primer.
- Is it porous, stained or has odour? → Go with a sealer or stain-blocking primer.
- Is it already painted and needs a refresh? → Use an undercoat, especially if changing colour.
- Is it outside and exposed to harsh Perth weather? → Use sealer + primer for added durability.
Pro Tip: Perth’s hot summers, coastal air, and sudden rains can take a toll on exterior paint. That’s why our expert house painters in Perth always take time to prep with the right base coats. It’s the secret to long-lasting exterior painting that doesn’t peel or fade.
Need reliable painting service with lasting results?
Let Final Touch Paint & Décor Handle the Prep for a Flawless Painting Finish – Inside and Out!
Our expert residential & commercial painting team knows exactly which primer, undercoat or sealer to use for every surface.
We handle interior and exterior painting projects with precision, from priming new drywall to sealing aged weatherboards. Trust our proven process to deliver a flawless, long-lasting finish.
Don’t risk a disappointing paint finish.
Call us at 0421 160 898
FAQs
Q1: What’s the difference between paint primer and sealer?
Both are preparation coats, but primers are generally used as the first coat on new surfaces to improve adhesion, block stains, and create a uniform base. Sealers are a special kind of primer used on problematic areas. They lock in stains and block moisture on porous or color-rich surfaces.
Q2: Can you use primer, undercoat, or sealer interchangeably?
No, you should not use primer, undercoat, or sealer interchangeably. Each is designed for a specific purpose. Primer improves adhesion, undercoat smooths and blocks previous colours, and sealer protects porous or stained surfaces. Using the wrong one can lead to poor paint adhesion, uneven coverage, or peeling.
Q3: Do I always need to use an undercoat?
Not always. Undercoat paint is applied after primer when you need a super-smooth, even base under your topcoat. It’s very helpful if you’re covering old paint or switching colours dramatically as it fills any minor imperfections and evens out colour so your final coat looks uniform.
Q4: Can I skip primer to save time and money?
We get why some try that, but it usually costs more in the long run. Skipping primer means using extra coats of finish paint to hide flaws, and your paint job may not last. Primer is often cheaper than your colour paint so using it actually saves money by reducing topcoats.
Q5: How do I know whether to use a water-based or oil-based primer/sealer?
For most modern home painting, water-based (acrylic) primers are fine and have low odour which is great for interior rooms. They clean up easily and still block most stains. However, oil-based primers or sealers are sometimes needed for really tough stains (like heavy nicotine) or very porous new surfaces. They are stronger at blocking stains and water but smell stronger and take longer to dry.